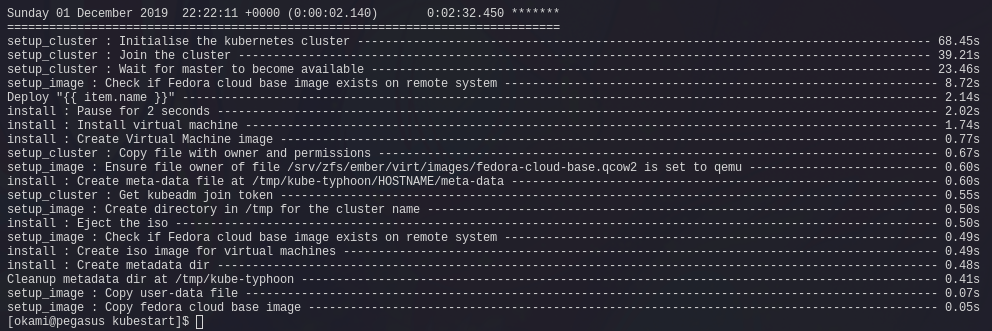
The two and a half minute Kubernetes cluster

(after you fulfill the prereqs first)
Hello everyone!
In this blog post I'm going to be doing a write-up on creating an Ansible script to deploy a Kubernetes cluster.
The Why
I'm trying to learn Kubernetes, and I tend to learn by breaking things.
I don't want to spend a significant amount of time setting up individual virtual machines, installing the packages and then setting the cluster up only to break something and tear it down again. Even with the help of the script I wrote in my previous blog post it'd still take a significant amount of time to get back to a usable cluster.
I wanted to build something that was able to produce repeatable builds, while still not taking out a sizeable part of my day waiting for the cluster to be ready.
There are already some fantastic projects out there that handle deploying and provisioning a cluster, such as Kubespray or Kops; but it feels like they're more suited for 'actual' cloud deployments rather than my at home setup. They also add some complexity that I don't feel comfortable trying to diagnose if things go wrong.
Additionally, by automating the task I am able to boost my automation skills (which is something I love to do).
The How
The scripts are made up of two Ansible playbooks that handle different things respectively. There is the 'init' playbook, and the deployment playbook.
'init' playbook involves downloading a fedora cloud image, installing the required dependencies onto that cloud image (such as Docker, Kubeadm and Container Networking plugins) and finally packaging it up into a 'base' image. This ideally should only need to be run once and copied over to your libvirt hosts.

The deployment playbook is concerned with taking that base image, and setting up the cluster using that image as a base to build the cluster from.
I've done it this way for a few reasons; the first being that it's a slow playbook. On each run it downloads a new fedora cloud image, installs and updates all packages, then packages it up ready for use. Overall taking about 4 minutes to complete.
The second reason is that I don't want to have to download the same packages on each node multiple times since the 'base' image has all the packages installed already. I want to reduce the amount of unneeded repetition as much as possible to make deployment fast. I feel that downloading packages several times onto what is realistically the 'same' machine, is unneeded.
The third reason being that doing it this way allows me to base virtual machines off of a single base image using QEMU's backing file ability. This gives the benefit of being able to save a significant amount of space, which can be in the realm of 50GB depending on cluster size.
Overview of deployment
On the deployment side of things, the script does essentially the same things as my provisioning script; but I've rewritten it to run all commands in parallel instead of one at a time.
Once the virtual machines are ready, the script logs into the first master and runs kubeadm init; before copying the join token over and running it on each of the nodes.
Finally, it copies the kubeconf over to /tmp/kubeconf.config and applies both Flannel and MetalLB as those are pretty much required dependancies for an 'at home' cluster.
And thats it! You've got a cluster deployed and ready to go.

Time to break stuff!
Challenges + What I learnt
I ran into a few challenges, one of which being that Fedora 31 refused to work with both ContainerD and Cri-o; meaning I was stuck with Docker for the time being. The Cri-o issue resulted from it not accepting that fedora 31 is a thing and reported it as an unknown Operating System.
The other challenge I had was rewriting the script to run in parallel, as I had initially written it to run one at a time. It proved to be incredibly useful to; as it now takes less time to deploy 6 virtual machines than it would have been to deploy one!
Running all the scripts in parallel also taught me some best practices in expansible. I'm now more confident using roles, facts and playbooks in Ansible!
Conclusion
I hope you enjoyed reading this writeup. Source code of this playbook is available here, and I will be adding a README so you can run this at home :)
I almost forgot, the gif. Enjoy :p

